




Opening a new mold is the single least reversible decision in an EVA case program. Once aluminium or steel is cut, the geometry of the shell is effectively frozen: deepening a pocket later means cutting inserts again, and changing the outer silhouette means restarting the whole development loop. This guide is therefore written as a working document rather than a market overview. It is aimed at buyers at tool, instrument, medical device and consumer electronics brands who already know they need a dedicated case and now have to judge a tooling quotation, plan the development chain and write the clauses that protect them afterwards.
EVA Case Tooling and Development: Mold Cost, Lead Time and Design-for-Manufacture Decisions
A tooling quote arrives as a single number, but that number is the sum of several independent decisions: which forming process you are actually buying into, how much metal goes into the tool, how many cavities it has, what finish you want on the surface, and how many trial rounds the factory has priced in. The sections below take those apart one by one and give you the questions to send back. Everything here assumes you are working with a custom case manufacturer rather than buying from stock, and everything assumes you want the tool to survive more than one season.
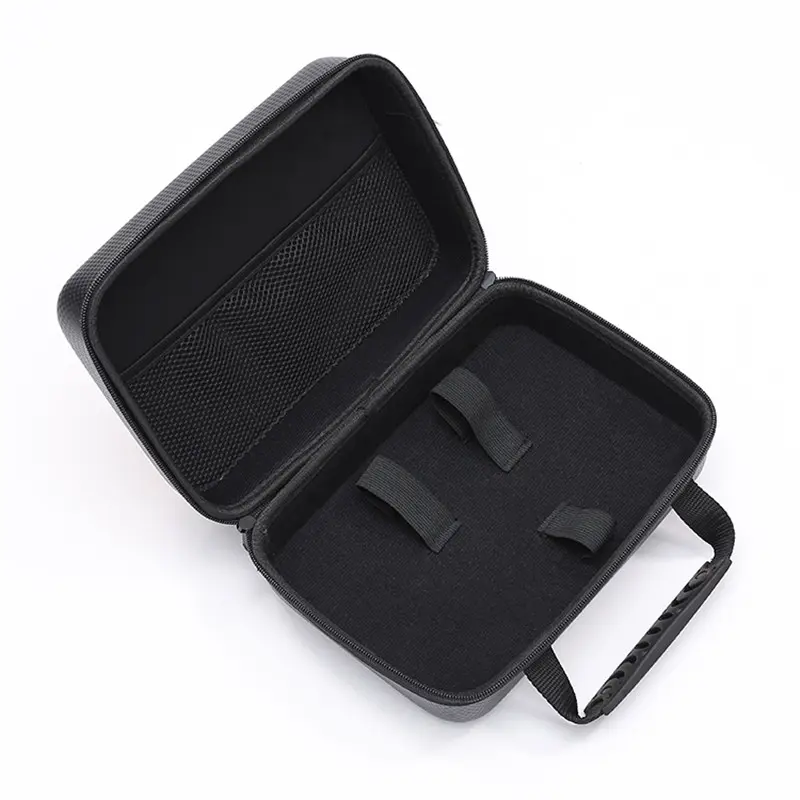
Matching the Forming Process to the Order Shape
Three processes are in normal use in an EVA factory, and they are frequently combined in one product: a moulded outer shell plus a separately produced interior. Any serious evaluation of EVA case tooling should begin here, because choosing wrongly is expensive: each route has a different tooling object, a different cost structure and a different reaction to design change.
Hot-press compression moulding
A heated aluminium or steel tool forms a laminated EVA sheet into a three-dimensional shell. This is the route for parts that need real depth, a defined silhouette, structural rigidity, or features integrated into the shell itself, such as moulded corner reinforcement, embossed logos or a rebate for a waterproof zipper. Dimensional repeatability is high from unit to unit, which matters when the case has to mate with other packaging or with a charger cradle. The cost is concentrated in the tool, so this route favours stable designs with repeat orders rather than one-off runs.
Die-cut and stamped construction
Here the laminated sheet is cut with a steel-rule die and assembled largely by sewing and edge binding, sometimes with heat-formed panels for local shaping. Tooling is cheaper and quicker to produce,changes are relatively cheap, and the route tolerates lower volumes. The trade-off is that three-dimensional form is limited: sharp shape definition, deep draws and tight tolerance pockets are harder to hold consistently. Many buyers start here to prove a product and migrate to compression moulding once volumes justify it.
CNC-cut foam inserts
The interior is almost never moulded. Interior foam is normally cut on a CNC router or water-jet from a digital file, which means the layout can be revised without touching any tooling. This is the right choice when the product set changes often, when one shell must serve several SKUs, or when you need precise clearance around an irregular device. Ask specifically which insert process is quoted, because die-cut inserts and CNC inserts have different minimum pocket widths and different revision economics.
What Actually Makes Up Mold Cost
An honest quotation can be broken into five lines, and you should ask your supplier to present it that way. A single lump price makes it impossible to see what you are trading off when you revise the design.
Mould material and cavity count
Aluminium is cheaper and faster to machine and is adequate for most case volumes; a custom EVA case mold in aluminium is normally what a first serious quotation describes. steel costs more but wears better over long runs and holds fine surface detail longer. Cavity count is the other multiplier: a single-cavity tool is cheaper to build and slower per unit, while a multi-cavity tool presses more than one shell per cycle and costs more up front. Ask the factory to quote both configurations against your annual volume, so you can see where the two lines cross. Because material and cavity count dominate the figure, this is where mold cost moves most when you change a specification.
Complexity, surface finishing and trial rounds
Deep draws, side actions and undercuts require more machining and more troubleshooting, and they lengthen both build and sampling. Surface finishing is its own line item: a textured grain, a mirror finish, or an engraved logo all add operations and all constrain what is possible later. Finally, ask how many trial rounds are included. Each round consumes machine time, material and skilled labour, and a quotation that includes one included trial round is not comparable with one that includes three.
Deciding Whether Tooling Is Worth It
Instead of looking for a rule of thumb, build the comparison yourself. The structure below is deliberately arithmetic rather than prescriptive, because every programme has different product economics.
The amortisation calculation
Start with the tooling total, including the mould, any cutting dies, CNC programming and shipping of samples. Divide it by the number of units you realistically expect across the product life, not just across the first purchase order, and you get a per-unit tooling burden. Add that to the factory unit price for the custom case, and you have the true landed comparison figure. Set it against your current alternative: the unit price of a generic or adapted case, plus any measurable costs you absorb today because the fit is imperfect, such as return handling, replacement of damaged goods, or additional protective packaging you currently add.
Then test three variables before deciding. First, order quantity: ask for the factory minimum per production run and per colourway, because a low unit price is meaningless if it requires you to hold twelve months of inventory. Second, unit-price dilution: request a price ladder at three quantity tiers so you can see how steeply the burden falls. Third, product lifecycle: if the device inside will be revised within the year, and if that revision changes dimensions, you may be buying a tool that dies early.
Tip: ask for the same design quoted in two routes — a low-tooling route using die-cut panels and CNC inserts, and a production-intent compression tool — and compare them at your real annual rather than at headline tool price.
The Development Chain from Brief to Mass Production
A standard EVA case OEM programme runs through six gates. Knowing which gate you are at, and what evidence closes it, is what keeps the schedule honest.
- Requirement confirmation: product drawings, target quantity, target market, shipping method, budget band and required drop/transit behaviour. Output is a written specification.
- 3D design: the factory proposes a shell design and an insert layout from your product geometry. Output is a 3D file plus a drawing with dimensions and tolerances.
- Prototype or hand sample: often produced by CNC foam and a temporary cover to check ergonomics and fit before any metal is cut.
- Trial shot (T1): the first parts off the real tool, used to evaluate shell formation, surface quality and fit.
- Golden sample sign-off: one or more approved physical parts sealed as reference for both sides.
- Mass production: scheduled against the approved reference sample and the agreed inspection standard.
Lead Time and the Critical Path
Your own planning should start from the longest chain, not the shortest. Typical ranges for a new compression tool, assuming reasonable responsiveness on both sides, are roughly: one to two weeks for specification freeze; five to ten working days for 3D design review; twenty to thirty-five working days to build an aluminium tool and thirty to forty-five for steel; three to seven days to the first trial shot; seven to fifteen days per revision round; and twenty-five to forty days from sign-off to finished goods sailing. Because several of those steps depend on inputs you control, schedule disputes are almost always about the links between steps rather than the steps themselves.
Where projects typically slip
- Missing product geometry: no accurate STEP file or physical sample of the device, so the factory designs against photographs.
- Unfrozen artwork and branding: logo placement or surface texture decided after the tool is already being machined.
- Too many SKUs in one tool: every additional variation adds alignment time and multiplies the chance of a rejected trial.
- Custom hardware: zippers, pulls, logo plates and straps often carry their own lead time, and standard hardware may not match your colour target.
- Approval latency internally: each day a sample sits unopened on a desk moves the whole critical path.
- Public holidays in the production country: plan around them explicitly in your project calendar.
Ask your supplier for a date-bearing schedule with named owners per step, including response deadlines for your own team, rather than a single headline number. That single request removes most of the ambiguity from any discussion about EVA case lead time.
Design for Manufacture: The Geometry Rules
A DFM review is the cheapest invested hour in the entire programme. Five parameters account for the majority of avoidable defects.
Draft angle, fillet radius and wall thickness
- Draft angle: vertical walls need taper so the formed shell releases cleanly. The required angle depends on draw depth and surface texture, and textured surfaces need more than smooth ones. Confirm the minimum for this specific design rather than assuming a general figure.
- Fillet radius: inside corners need a real radius. Zero-radius corners concentrate stress and cause tearing or poor material flow; ask what minimum radius this tool can achieve.
- Wall thickness uniformity: the foam flows and compresses unevenly where thick sections meet thin ones, producing sink marks and inconsistent rigidity. Aim for even material distribution and gradual transitions.
Insert pocket depth and webs
Pocket depth should be decided relative to the item height, leaving enough material above the item for retention while allowing a finger or thumb access to lift it out; a fully buried item is a usability complaint waiting to happen. Adjacent pockets need a minimum web width so the foam does not tear between them, particularly in soft grades. Always add a nominal clearance allowance to the nominal dimension of the device, then verify against the real sample rather than trusting the drawing alone.
Sample Approval and the Golden Sample Standard
Ambiguity here is what creates disputes six months later. Freeze parameters in writing, not in memory.
- Material specification: EVA grade and density, cover fabric, lamination method and backing.
- Colour reference: a physical approved swatch, plus the lighting condition under which it was judged.
- Dimensions and tolerances: external dimensions, internal clearances, and an agreed tolerance band.
- Insert layout version number: every pocket drawing carries a revision code.
- Hardware part numbers: zipper chain and slider type, pulls, feet, logo plate and strap fittings.
- Stitching and assembly: stitch density, seam construction and edge binding.
- Packaging: individual packing, carton marking and any labelling artwork.
Retain at least two sealed reference samples per side, signed and dated, stored away from strong light. Define the change rule in advance: a change requested by the buyer triggers a new version number, a revised quotation and a new cost owner, whereas a deviation from the sealed reference found during production belongs to the factory. Write the rule down before it is needed.
Mold Ownership, Maintenance and Amortisation Clauses
The tooling agreement matters as much as the tool itself. Insist on a separate document or a clearly separated clause set, independent of any purchase order for goods.
- Ownership: state plainly that the tool is buyer owned. Then state whether ownership transfers on full payment or after a defined amortised quantity.
- Amortisation: if the tool cost is recovered through unit pricing, specify the quantity over which it is recovered, the buyout formula for early settlement, and what happens if production stops before that quantity is reached.
- Exclusivity and non-use: the factory must not use the tool for other customers or sell the same geometry. Cover photographs and 3D files as well.
- Secondary tooling: cutting dies, CNC programmes and jigs are also tooling. Name them individually.
- Maintenance and life: define who pays for routine servicing, what the expected life is in shots, and the cost and trigger point for refurbishment.
- Storage and inactivity: agree a period of inactivity after which storage fees or a right to scrap may apply, and your right to take possession.
- Payment schedule: separate the tooling invoice from goods invoices so that tooling payment does not depend on a shipment schedule.
Product Fit: Which Categories Suit a Custom Tool
A custom tool makes sense when the geometry is unusual, the value of the contents is high, or the case is part of the product experience. The fit conditions below are written as engineering questions rather than as promises.
Fit conditions by category
- Hand tools and tool kits: suited when the set contents are fixed for at least one catalogue cycle, so that the insert layout does not require revision every time a SKU changes.
- Measuring and test instruments: suited when the device has an irregular outline or a fragile display and control area that stock cases cannot protect. Confirm panel clearance and the nominal device weight before finalising pocket layout.
- Medical and diagnostic equipment: suited when cleaning method, residue resistance and repeatable placement in a service workflow matter. Confirm compatibility of the cover fabric and foam with your cleaning agents, and confirm applicable regulatory requirements against the latest standard texts and official announcements.
- Consumer electronics and drone sets: suited when multiple accessories ship together and each needs a defined position. Confirm the accessory list version, because adding one item late can invalidate the whole layout.
Note also the physical limit of the process: confirm the maximum formable envelope of the press and the maximum practical draw depth. If parts exceed that envelope, the shell must change construction, and that is a different quotation entirely.
Data items to confirm with the factory before you open a tool
- Maximum usable platen area and maximum draw depth available on the press intended for your part.
- Minimum practical draft angle at the specified surface texture.
- Minimum web width between insert pockets and minimum achievable pocket corner radius.
- Available EVA sheet thickness range and hardness options, plus cover fabric options.
- Expected tool life in shots for the aluminium option versus the steel option on your geometry.
- Number of trial rounds included, pricing per additional round, and whether sample freight is included.
- Minimum order quantity per production run and per colourway.
- Whether proposed hardware is standard stock or custom, and its separate lead time.
- Available inspection and testing reports, including any transit simulation method used, noting that certification applicability should be verified against the latest standard texts and official announcements.
RFQ Checklist: What to Request Before Releasing Tooling
Send the RFQ after you have the above answers, not before. Ask for, in writing: an itemised tooling quotation broken into the five lines described earlier; a mould drawing or layout drawing; a DFM report listing the constraints the design violates; a date-bearing development schedule; material data sheets for shell, cover and foam; stated tolerances; the sample policy and pricing; MOQ and price ladders; payment terms; a draft tooling agreement; the inspection standard applied to production; and, where available, photographs or test data for a comparable project.
FAQ
Can I adapt an existing tool instead of opening a new one?
Often yes. Adapting an existing shell saves money if the external dimensions and silhouette work for you, because the expensive item is the shell tool. What changes cheaply is typically the zipper path, the branding and the insert layout. The constraint is that the outer geometry is fixed, so a poor fit cannot be solved later without new tooling.
How many trial rounds should I budget for?
Plan for two to three rather than one, particularly on a deep draw or a multi-SKU insert layout, and ask how many are priced into the quotation. Ask too what happens if the factory needs an additional round for reasons within its own control.
Aluminium or steel?
Judge it against expected total volume and expected tool life, plus how fine the surface detail must stay. If launch volumes are small and you may revise the design, spending less on the tool preserves flexibility. If the design is frozen and volumes are sustained, a harder tool can be cheaper per unit over the life.
Can one tool produce multiple colourways?
Usually yes, because colour comes largely from the laminated cover material rather than from the tool itself. Confirm changeover scrap, minimum quantity per colourway, and whether the factory stocks the colour you want in the required fabric.
What happens if my product is revised mid-programme?
A small dimensional change to a device usually only requires a revised insert layout, which is relatively cheap. A change that moves the outer envelope or the draw depth can require re-cutting the shell tool. This is why the version control discipline described above matters: it tells you immediately which category a proposed change falls into.
Who owns the CNC programmes and cutting dies?
Treat them exactly as you treat the mould. If they are not named in the tooling agreement, assume they are not covered, and write them in explicitly.
Ready to source custom EVA cases for your next tool, instrument or electronics launch? Send your specs — product STEP file or drawings, photos, dimensions, target quantity and destination market — and Request a Quote from our team for an itemised tooling quotation, a design-for-manufacture review and a date-bearing development schedule.
Related Pages
- EVA Tool Case Purchase Order Guide
- EVA Tool Case Sample Evaluation Guide
- EVA Case Bulk Order Tips
- EVA Tool Case Custom Inserts Design
Post time: Oct-16-2026