




How to Design a Custom EVA Tool Case: A Step‑by‑Step OEM Guide
If you source protective packaging for tools, diagnostic gear, electronic kits or field equipment, custom‑molded EVA tool cases strike a strong balance of impact resistance, portability and brand presentation. Many procurement teams jump straight to requesting quotes without clarifying core requirements, which leads to repeated sample revisions, unexpected extra costs, or finished goods that do not fit real‑world usage.
This practical OEM guide walks buyers through every phase of designing a custom EVA tool case, from defining initial project goals all the way through sample approval and mass‑production hand‑off. You will learn which specifications truly matter, common pitfalls to avoid, and how to communicate clearly with manufacturers to keep timelines and budgets predictable.
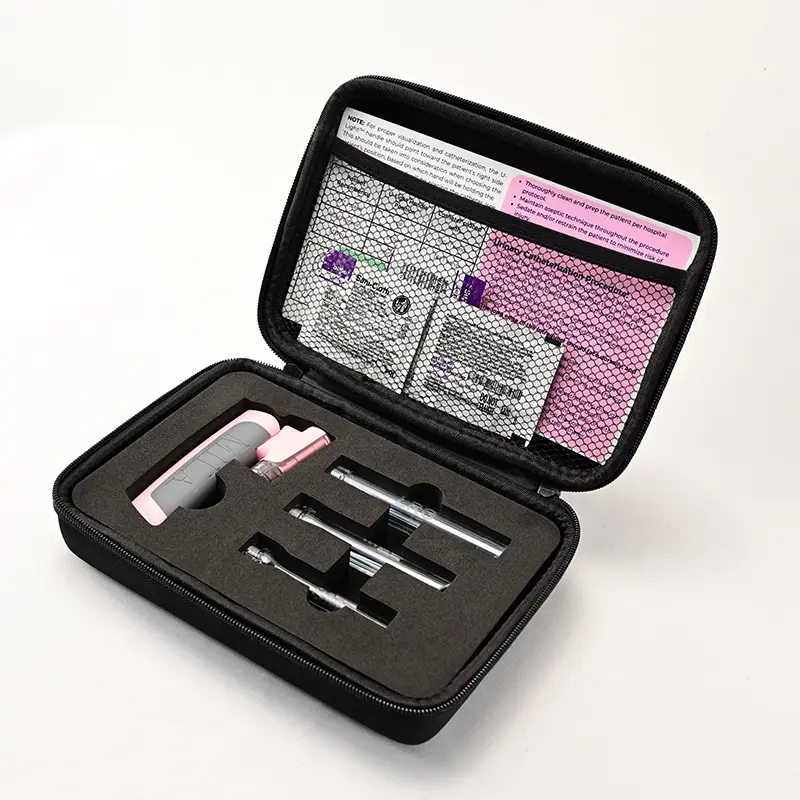
Why Choose Custom EVA Tool Cases Over Alternatives
Before diving into design steps, it helps to understand where custom EVA tool cases add value compared to generic toolboxes, soft nylon bags, or rigid plastic hard cases.
- Superior shock absorption: Compression‑molded EVA shells and precision‑cut foam inserts cushion sharp impacts during transit or field drops, protecting delicate instruments and expensive hand tools.
- Tailored interior fit: Custom CNC‑carved foam cavities cradle each component securely, preventing parts from shifting, scratching or rattling inside the case.
- Light‑weight portability: Compared with heavy injection‑molded plastic or metal tool boxes, EVA cases cut down overall carry weight while maintaining shell rigidity.
- Full branding capability: You can match brand colours, add embossed or printed logos, custom zippers, handles and trims to align with product line aesthetics.
- Flexible compliance support: Qualified manufacturers can build cases that meet REACH, RoHS and other regional material requirements for global retail and industrial markets.
No storage solution is perfect. EVA cases are not built for extremely heavy static stacking like thick metal tool chests. For most portable tool kits, diagnostic sets and field‑deployed hardware, custom EVA remains one of the most cost‑effective OEM protective‑packaging options.
Step 1: Define Project Objectives & Gather Complete Reference Information
The biggest source of project delays is vague requirements. Before contacting any manufacturer, document your real‑world use‑cases and collect all physical or digital references. Think beyond “we need a tool case”. Ask these practical questions:
- Primary use environment: Will the case stay in an office workshop, travel inside delivery trucks, go out for outdoor field work, or sit on retail store shelves? Outdoor use calls for more abrasion‑resistant outer fabric and higher water‑repellent performance.
- What items will be stored? Compile a full list of every tool, accessory, cable, adapter and manual that needs to fit inside. Record exact dimensions, weights and note fragile or scratch‑prone components. If possible, send physical product samples to your supplier; this produces far better fitting foam inserts than dimension lists alone.
- Functional priorities: Is shock‑protection your top priority? Or waterproofing, compact travel size, visual brand appearance, or keeping unit costs low? Rank these priorities so your supplier can make smart trade‑offs when conflicts emerge.
- Project commercial parameters: Outline expected order volume (sample quantity, trial‑order size, future repeat‑order forecasts), target unit‑cost range, required delivery deadline, and any certification requirements for your target sales regions.
Buyer Pro Tip: Build a simple requirement checklist. When sending inquiries, attach tool dimensions, photos of items to be housed, Pantone colour references for branding, and certification standards. Vague requests like “make me a hard tool bag” will almost always result in multiple rounds of back‑and‑forth communication.
Step 2: Select Core Materials & Structural Specifications
Custom EVA tool cases use a typical three‑layer sandwich build: outer laminated fabric, rigid EVA foam core shell, and soft interior lining. Every material choice shapes protection level, weight, look, feel and final cost.
EVA Shell Hardness & Thickness
EVA hardness is measured using the Shore C scale. Match hardness to your equipment weight and protection needs:
- 40‑50 Shore C: Flexible, light‑duty, best for small, lightweight accessory kits.
- 60 Shore C (most common for tool cases): Semi‑rigid balanced performance. Works for most hand‑tool kits, test meters and mid‑weight electronics.
- 75+ Shore C: Heavy‑duty ultra‑stiff shells for power‑tool sets and high‑value precision instruments that resist crushing under moderate stacking pressure.
Shell thickness guidance:
- Small compact cases: 3 mm EVA core
- Standard‑size tool kits: 4‑5 mm EVA core
- Heavy‑weight industrial equipment: 6‑8 mm reinforced EVA core
Outer Fabric Options
Your outer laminate defines wear‑resistance and visual style:
- 600D Oxford fabric: Good all‑round value, stain‑resistant, easy to clean, widely used for mass‑market OEM tool‑kit projects.
- 1680D Ballistic Nylon: Highest abrasion and tear resistance, ideal for construction‑site and heavy‑field‑use environments.
- Carbon‑pattern PU / Matte PU: Premium visual finish for consumer‑facing products, adds water‑repellent properties, though less tear‑resistant than high‑denier nylon.
Interior Foam Insert Options
The interior foam insert is where most fit‑and‑finish success lives. Two mainstream OEM approaches:
- CNC‑carved molded foam: Computer‑numerical‑control carving creates exact custom cavities shaped to each tool. Parts sit snug without movement. Recommended for premium tool‑sets and precision instruments. No expensive hard mold required for the foam itself.
- Pre‑scored pick‑pluck foam: Lower‑cost alternative, where end‑users tear away foam cubes manually to make custom compartments. Less precise fit; better suited for low‑cost generic kits.
Additional interior features you can specify: mesh zip pockets for manuals and cables, elastic retention straps, velvet anti‑scratch lining for polished metal surfaces.
Hardware & Branding Decisions
Hardware elements include zippers, zipper pulls, carry handles, detachable shoulder straps and rubber feet. Choose heavy‑duty coil zippers for frequent daily use. Thin cheap zippers are one of the most common early‑failure points on tool cases.
For branding, available OEM techniques include emboss/deboss into the EVA shell, silkscreen printing, heat‑transfer print, woven labels, or silicone patches. Prepare vector‑format logo artwork and specify exact logo placement and Pantone colour codes.
Step 3: Digital Design, CAD Rendering & Technical Spec Lock‑In
Once requirements and material selections are shared, a professional manufacturer will translate your brief into digital design outputs before cutting physical samples.
You will typically receive two sets of deliverables for review:
- 2D technical drawings: Showing unfolded shell layout, foam cavity dimensions, hardware positions and seam construction.
- 3D photorealistic renderings: Visual mock‑ups showing finished‑case shape, colours, logo placement, handle and zipper positions.
This phase is your chance to adjust sizes, re‑arrange internal compartment layouts, shift logo locations, or swap fabric options, with zero physical‑sample costs.
Critical action: Once you are satisfied with digital outputs, request a formal written technical specification sheet. This document records every agreed‑upon detail: material grades, thicknesses, hardware part numbers, colours, logo method and position, interior‑foam layout, compliance requirements. Both buyer and supplier should acknowledge this document. This spec sheet becomes your reference to judge later samples and bulk‑production quality.
Do not skip formal spec confirmation. Verbal discussions easily get misinterpreted once production starts.
Step 4: Physical Prototype & Pre‑Production Sample Validation
Digital renders look great, but real‑world fit, zipper smoothness, handle comfort and foam snugness can only be judged with a physical pre‑production sample.
A proper pre‑production sample should use the exact materials, hardware, foam‑insert and branding process that will be used in mass production. Avoid “show samples” made with substitute fabrics or temporary printing; these give misleading impressions of the final product.
When you receive your prototype, run these practical checks:
- Fit test: Insert every tool and accessory. Check if parts go in and come out easily. Cavities should hold items securely without being so tight that removal requires excessive force. Watch for rattling or too‑much free play inside cavities.
- Hardware function: Open and close zippers dozens of times; check pulls run smoothly without catching. Test handles under load simulating real‑world carrying weight.
- Visual audit: Inspect logo print or emboss quality, colour match to your Pantone references, check stitching quality and trim‑colour alignment.
- Basic durability simulation: Light drop test, squeeze the shell to confirm rigidity matches expectations.
Write clear, specific feedback for revisions. Instead of “the foam does not feel right”, write “deepen cavity for power‑drill handle by 2 mm; widen cable compartment”. Repeat revisions until you are happy.
Once all changes are completed, sign‑off on a final PP (pre‑production) approval sample. This signed‑off physical sample, paired with your technical spec sheet, is your benchmark for bulk‑production inspection.
Timeline note: Plan buffer time for sample iterations. Most projects need 1‑2 rounds of sample tweaks. Build 7‑10 days revision buffer into your overall project timeline to avoid rushing decisions before mass‑production starts.
Step 5: Mass Production, Quality Control & Shipment
With PP sample fully approved, manufacturing moves to mass‑production.
Reputable EVA case factories follow this standard workflow:
- Heat‑press molding of EVA shell shapes according to confirmed tooling.
- Sewing outer fabric, attaching zippers, handles and other hardware.
- Fabrication and fitting of custom‑cut foam inserts.
- Branding application (emboss, print, labels).
- Full‑batch quality inspection: dimensional checks, zipper‑cycle testing, visual cosmetic inspection, spot‑check of fit‑and‑finish against the approved PP sample.
- Outer export carton packaging, labelling and preparation for shipment.
Standard lead‑time after PP‑sample approval sits around 18‑22 working days, though this shifts with order‑size and factory capacity load.
As a buyer, define your inspection terms in advance. Decide whether you will rely on the supplier’s internal QC or bring in third‑party inspection services before goods leave the factory. Confirm export carton specs, labelling requirements and shipping Incoterms early in the project.
Common OEM Custom‑Design Mistakes to Avoid
Many procurement teams run into predictable set‑backs. Keep these pitfalls top‑of‑mind:
- Insufficient buffer space in foam cavities: If foam cavities are cut exactly to tool dimensions, items become very hard to insert and remove. Always allow 2‑3 mm reasonable clearance.
- Choosing low‑grade zippers to cut cost: Zippers are high‑wear components. Poor‑quality zippers are the most frequent source of customer complaints.
- No signed‑off technical specification sheet: Relying on chat history or emails alone. Without a formal spec, there is no objective baseline when bulk‑goods deviate from expectations.
- Skipping real‑world prototype testing: Approving production purely from 3D renders. Renderings cannot show ergonomics, fit, zipper performance or material texture.
- Over‑complicating foam‑insert designs: Highly multi‑coloured, ultra‑fragmented foam layouts raise sampling and production costs substantially. Simplify internal layout where practical.
- Ignoring compliance requirements until production is nearly complete: Confirm REACH, RoHS or other certification requirements before material sourcing begins. Retrofitting compliant materials late in a project adds cost and delays delivery.
Frequently Asked Questions
Q: What is typical minimum‑order quantity for fully custom‑molded EVA tool cases? Most OEM manufacturers set a 500‑unit MOQ for projects with exclusive custom‑molded foam inserts and custom branding. Blank‑shell cases using existing molds without custom foam can often support smaller trial batches.
Q: How long does the full OEM project take from initial inquiry to shipment? Total timeline combines requirement review, digital design, sample iteration and mass‑production. For most projects, expect 6‑8 weeks total, depending on sample‑revision rounds.
Q: Can I modify the foam‑insert layout later without remaking the whole case shell? Often yes. If the outer shell mold stays unchanged, you can redesign and recut interior foam inserts for future production runs without new shell‑mold investment.
Q: Do I own the tooling / mold for my custom case? This varies between suppliers. Mold‑ownership terms should be explicitly discussed and written into your agreement. Some factories retain mold ownership in exchange for lower up‑front tooling charges; others sell full mold ownership to buyers.
Final Thoughts
Designing a custom‑OEM EVA tool case is much more than picking colours and adding a logo. Success comes from thorough requirement gathering, thoughtful material selection, careful digital review, rigorous physical‑sample validation, and clear documented specifications shared with your manufacturing partner.
By working methodically through each step, procurement teams can avoid costly rework, control budgets, and end‑up with durable, well‑fitting protective cases that improve product value and end‑user satisfaction.
Post time: Aug-21-2026